Configure an Aruba Instant AP
Our step-by-step guide to configure access points to forward IoT data to Pareto Anywhere.
The TL;DR (Too Long; Didn't Read)
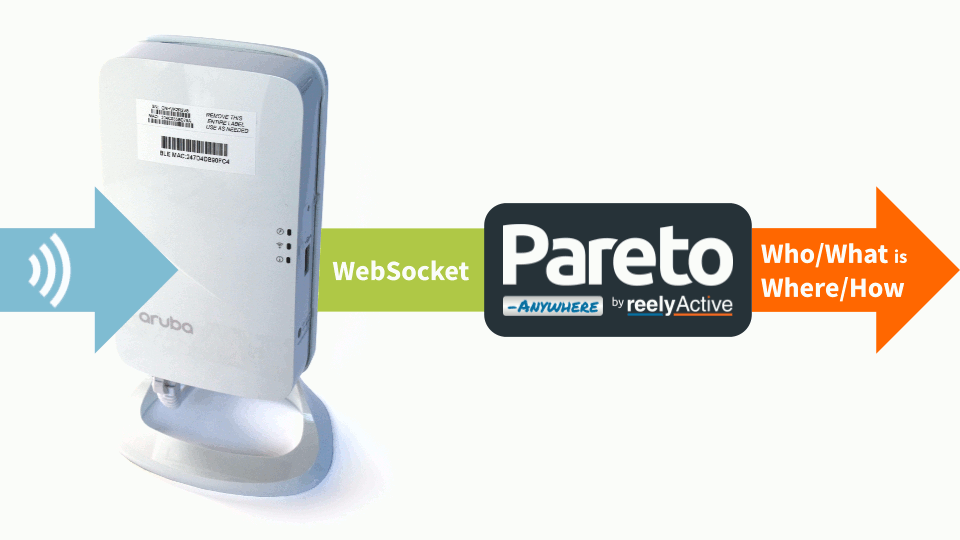
Configure (AOS 8.x) APs as IoT infrastructure using reelyActive's open source middleware
- What will this accomplish?
- The APs will forward Bluetooth Low Energy, EnOcean Alliance and/or WiFi packets to a server running Pareto Anywhere.
- What's Pareto Anywhere?
- Pareto Anywhere is open source IoT middleware that makes the data from just about anything usable.
- Aruba Instant only?
- APs can just as well be configured using Aruba Central or controllers through interfaces similar to those shown here. APs running AOS 10.x use IoT Operations (see Alternatives below).
Alternatives
Tutorials to consider instead
-

-
Configure Aruba IoT Operations
Configure access points running AOS 10.x to forward IoT data for processing by Pareto Anywhere.
-

-
Run Pareto Anywhere for Azure with Aruba APs
Use Aruba IoT Transport for Microsoft Azure and run our open source middleware as an Azure Function.
Prerequisites
One or more HPE Aruba Networking access points.
- AOS 8.8 and higher is supported
- AOS 10 and higher is supported
Connect to the AP Step 1 of 3
Connect and log in to the access point over a local network.
- Will admin access be required?
- Yes. The admin login credentials will be required to complete the configuration of the AP.
- Is there a command line option?
- Yes. Should configuration via CLI be preferred over GUI, consult the Aruba documentation to enter the settings presented in Steps 2 and 3.

Connect the AP to the local network Part 1
Ensure that the access point is powered and connected to the local network from which it will be configured.
Consult the Aruba documentation specific to your AP model, if required.
Log in as admin Part 2
From a computer on the local network, browse to the access point via its IP address (ex: http://192.168.0.1).
Log in with the username admin and the corresponding password, then proceed to the next step.
Configure the IoT Transport Stream Step 2 of 3
Create and enable a Telemetry Websocket to forward data to Pareto Anywhere.
- What's a transport stream?
- A transport stream defines what data is forwarded where and how, in this case what ambient BLE data is sent to Pareto Anywhere via Websocket.
- Why IoT and not RTLS?
- The IoT service affords both real-time location and sensing for a wide range of devices whereas the RTLS service is specific to more precise location of only certain devices.

Prerequisites
Aruba Instant version 8.8 or greater is required. First upgrade the AP firmware if/as required.
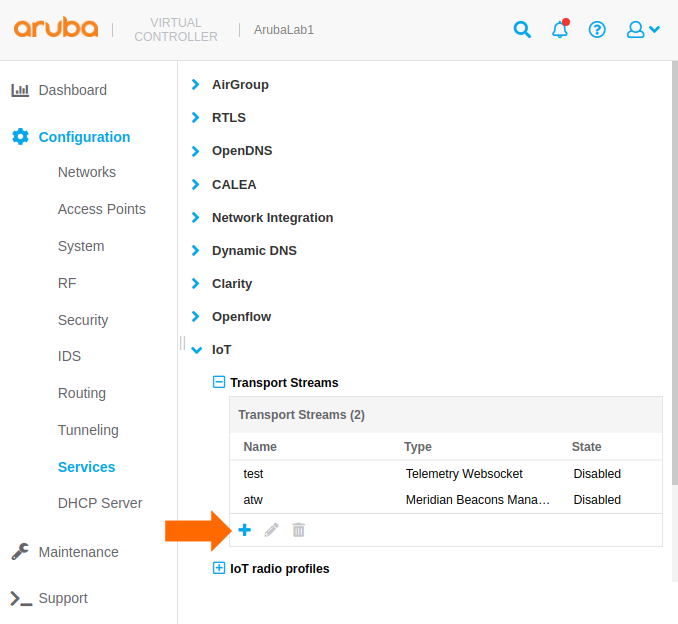
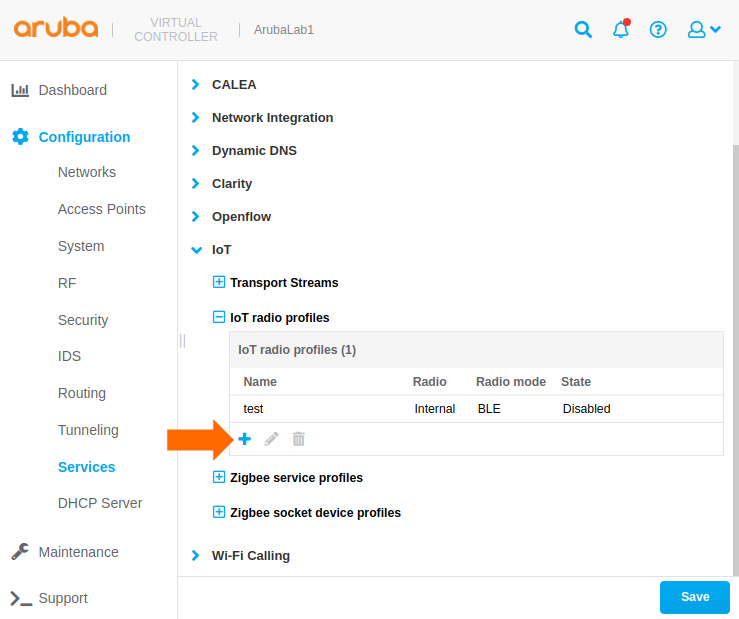
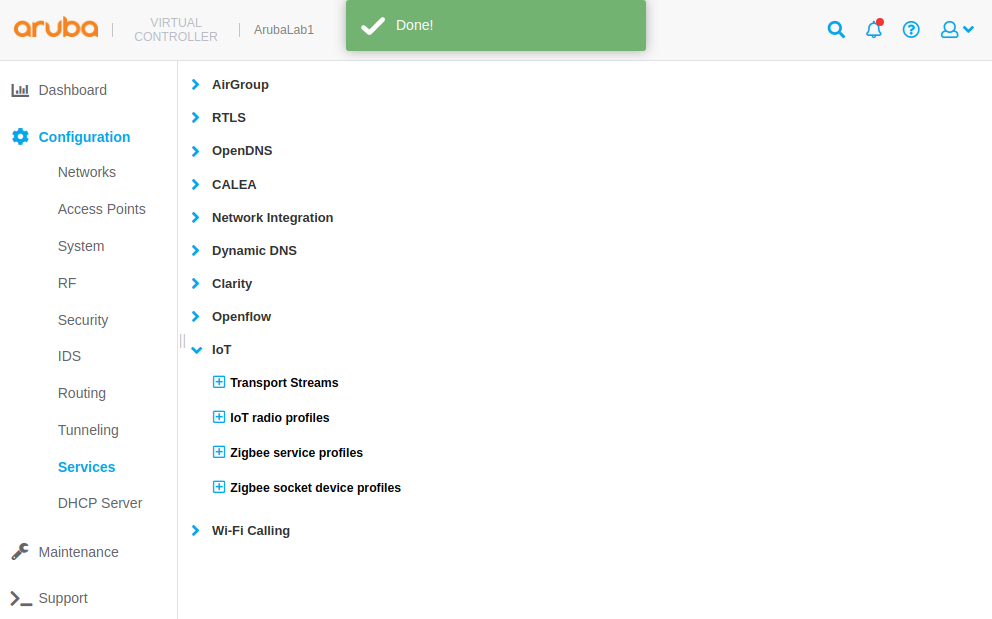
Create a new transport stream Part 1
From the admin page:
- Browse to Configuration / Services from the left menu
- Select the IoT accordion from the main window
- In the IoT Transport Streams table, click on the + icon to create a new transport stream
Configure the transport stream Part 2
Consult the Aruba documentation for the latest Aruba IoT Websocket Interface guide, if required.
Complete the new transport stream popup as follows:
| Parameter | Value | Notes |
|---|---|---|
| Name | reelyActive | User-defined |
| State | Enabled | |
| Server type | Telemetry Websocket | |
| Server URL | ws://… wss://… (See examples) |
Secure WebSockets recommended for production deployments. |
| Device classes | All | Optionally filter by class |
| Reporting interval | 900 seconds | Reduce to 5 seconds or less for occupancy analytics |
| BLE data forwarding | Enabled | Forwards payload/sensor data |
| Per-frame filtering | Disabled | |
| RSSI reporting format | Last | Best option for real-time location |
| Environment type | Office | Influences RSSI-based distance estimation in device filters |
| Proxy | — | Complete if required |
| Authentication | Use token | Required |
| Access token | token | Ignored by Pareto Anywhere |
| Device filters | 5 seconds (Reporting activity) |
Pareto Anywhere discards stale data |
Server URL
The server URL depends on the AOS version and whether regular or secure WebSockets are used.
- AOS 8 WebSocket
- ws://192.168.0.123:3001/aruba/aos8
Pareto Anywhere on LAN, using port 3001 - AOS 8 Secure WebSocket
- wss://12.34.56.78/aruba/aos8
Pareto Anywhere on WAN, using port 80 - AOS 10 Secure WebSocket*
- wss://12.34.56.78:3001/aruba/aos10
Pareto Anywhere on WAN, using port 3001
Adapt the examples above as per your configuration.
*AOS 10 requires secure WebSockets.
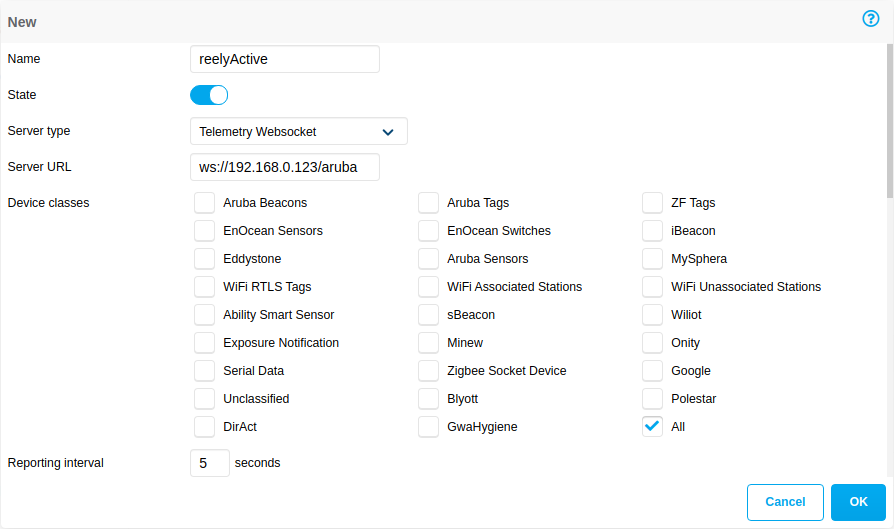
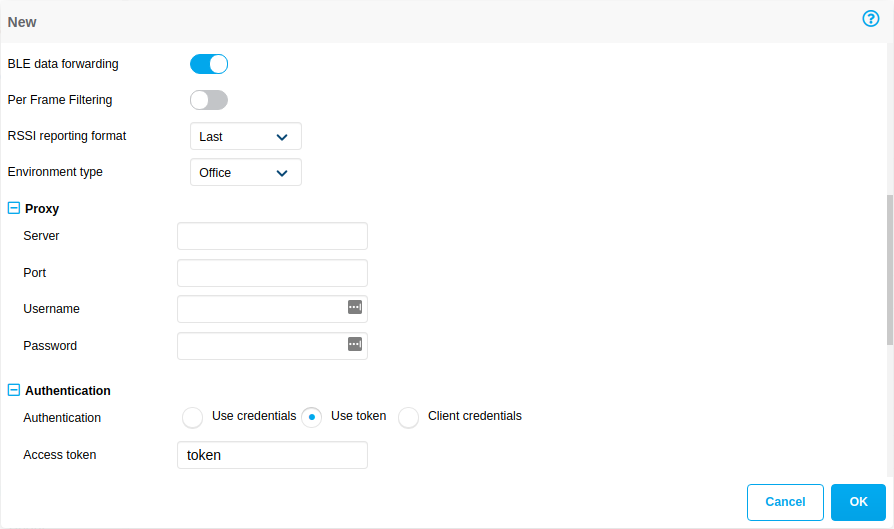
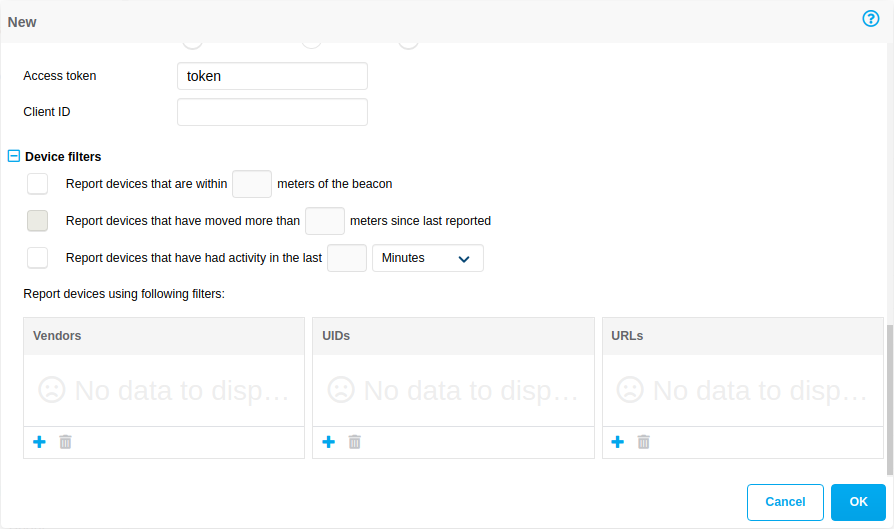
Click OK to complete the configuration.
Upload the CA certificate (OPTIONAL) Part 3
Required only when using Secure WebSockets.
From the admin page, browse to the section where security certificates are managed, and upload the CA certificate (ex: CA_certificate.pem). Assign the certificate to IoT Transport (ex: Security - Certificate Usage - IoT CA Cert).
Configure the IoT Radio Profile Step 3 of 3
Create and enable the Bluetooth Low Energy radio profile on the AP.
- What's a radio profile?
- A radio profile defines which low-power wireless radios will be enabled on the AP as well as their configuration.
- Why BLE?
- Bluetooth Low Energy devices may spontaneously transmit advertising packets for discovery, interaction and telemetry, an abundant source of ambient data which can be received by the AP's BLE radio.

Create a new radio profile Part 1
From the admin page:
- Browse to Configuration / Services from the left menu
- Select the IoT accordion from the main window
- In the IoT Radio Profiles table, click on the + icon to create a new radio profile
Configure the radio profile Part 2
Consult the Aruba documentation for the latest IoT – Basic Setup Guide, if required.
Complete the new radio profile popup as follows:
| Parameter | Value | Notes |
|---|---|---|
| Name | reelyActive | User-defined |
| State | Enabled | |
| Radio | Internal | |
| Radio mode | BLE | |
| BLE operational mode | Both | Beaconing = discoverability, Scanning = discovery |
| Console | Off | |
| Tx Power | 0 dBm |
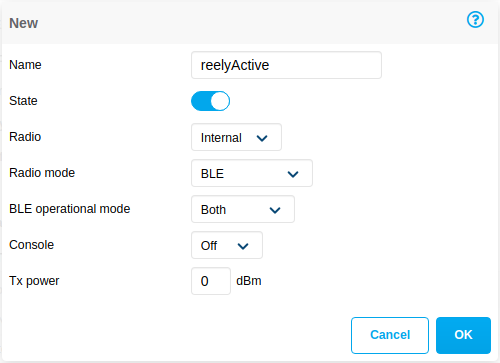
Click OK to complete the configuration.
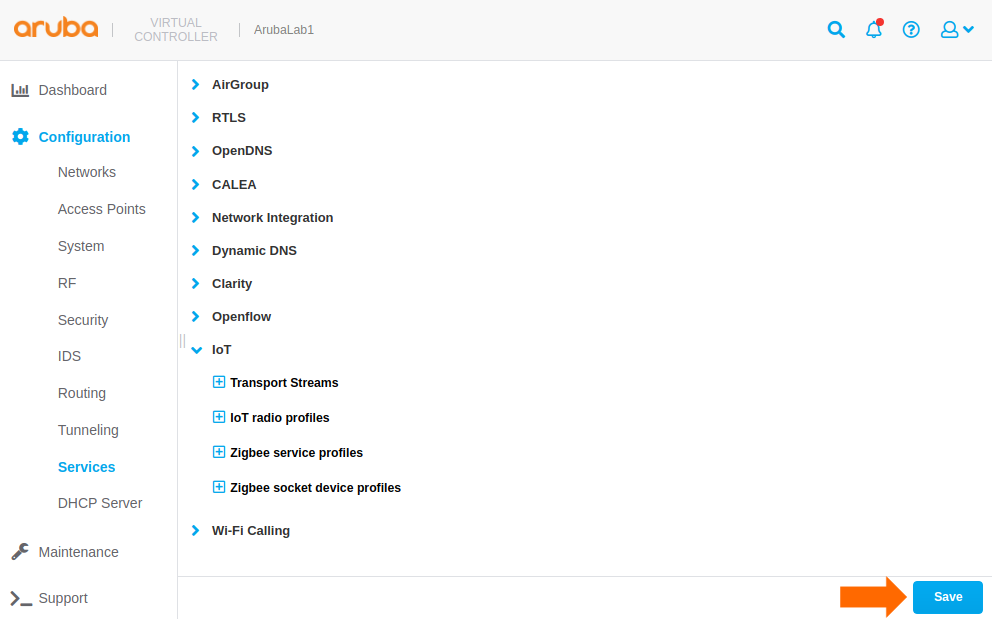
Save the changes Part 3
Click the Save button at the bottom right of the window to complete and enable the configuration.
Observing data in Pareto Anywhere requires no additional action if an instance based on the pareto-anywhere package is running, or, for quick-and-dirty validation, run barnowl-aruba as described below.
If a Pareto Anywhere installation based on the pareto-anywhere package is already present and running on the target computer on the host network, the data forwarded by the AP should be available in both the web apps and APIs.
-

-
Run Pareto Anywhere on a PC
Install and run Pareto Anywhere on a personal computer to make sense of things.
-

-
Run Pareto Anywhere on a Raspberry Pi
Install and run Pareto Anywhere on a Pi to make sense of things.
If using Secure WebSockets, add the corresponding certificate.pem and key.pem files to the /config folder of pareto-anywhere. Pareto Anywhere will automatically detect these files on boot and use HTTPS & WSS for secure operation.
To quickly validate that data is correctly received on the target computer on the host network, it is possible to run barnowl-aruba standalone to initiate a WebSocket server on port 3001 using the /aruba/aos8 route as follows:
git clone https://github.com/reelyactive/barnowl-aruba.git
npm install
npm start
If the access point is correctly configured, and at least one compatible Bluetooth Low Energy device is advertising in range, raddec data should appear in the console.
AOS 10 requires secure WebSockets (wss://): consult the barnowl-aruba documentation regarding the npm run secure option.
Enjoy the real-time data stream
Our cheatsheet details the raddec and dynamb JSON output from the Pareto Anywhere open source middleware.
-

-
Developers Cheatsheet
"Owl" you need to know about Pareto Anywhere's core data structures.


Tutorial prepared with ♥ by jeffyactive.
You can reelyActive's open source efforts directly by contributing code & docs, collectively by sharing across your network, and commercially through our packages.Where to next?
Continue exploring our open architecture and all its applications.
-

-
Directory of Devices
Browse all device configuration tutorials and development guides.
-

-
reelyActive Developers
Browse all developer documentation and tutorials.
-

-
reelyActive & HPE Aruba Networking
reelyActive is an Aruba Technology Partner