Elastic Cloud Deployment Guide
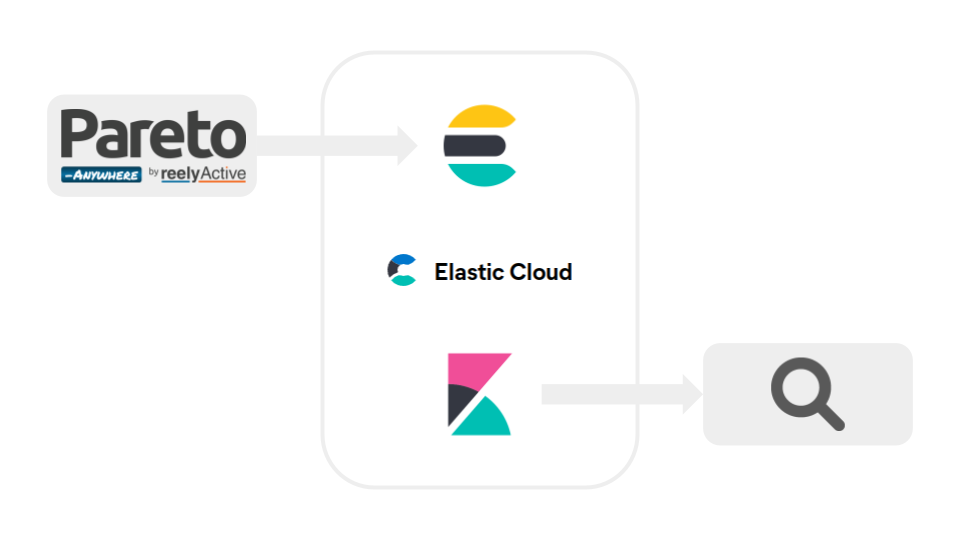
Store and analyse data from context-aware physical spaces in the cloud.
The TL;DR (Too Long; Didn't Read)
Learn how to create an Elastic Cloud deployment that ingests data from Pareto Anywhere.
- What's Elastic Cloud?
- Elastic Cloud is the easiest way to deploy, use and scale Elastic products on AWS, Azure or GCP.
- What's Pareto Anywhere?
- Pareto Anywhere is reelyActive's open source middleware that enables context-aware physical spaces with Elastic Stack integration.
- Can I deploy locally?
- Yes, it is possible to download Elasticsearch and download Kibana to deploy as you please, however this is outside the scope of this tutorial.
Create a Deployment Step 1 of 3
From the Elastic Cloud dashboard, choose and create a new deployment.
- Is this free of cost?
- Elastic offers a free trial to start. After the trial, monthly billing will be applied against the cloud resources consumed.
- How long does it take?
- Creating a new deployment only takes a few minutes.

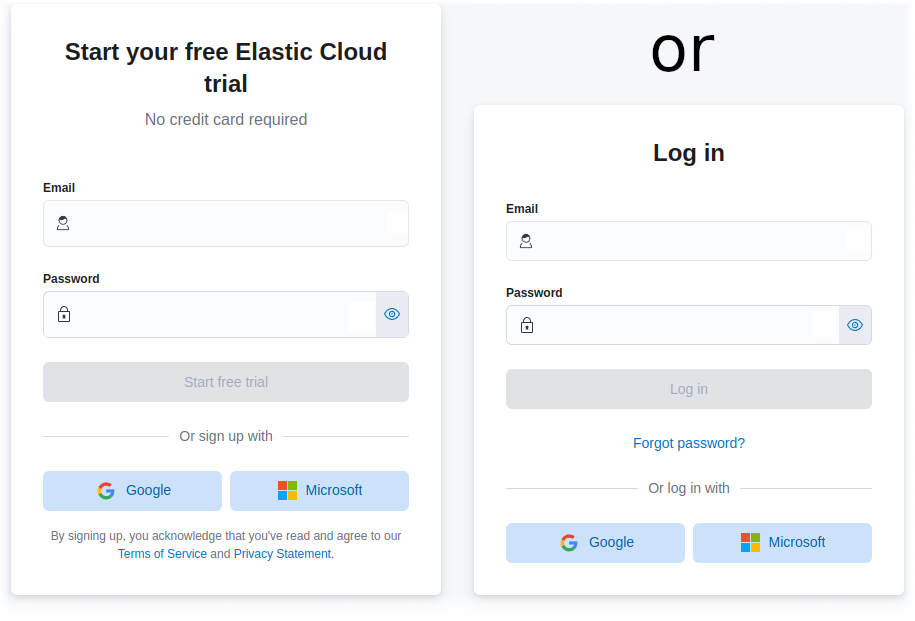
Sign Up or Log In Part 1
Browse to cloud.elastic.co and sign up or log in depending on your situation.
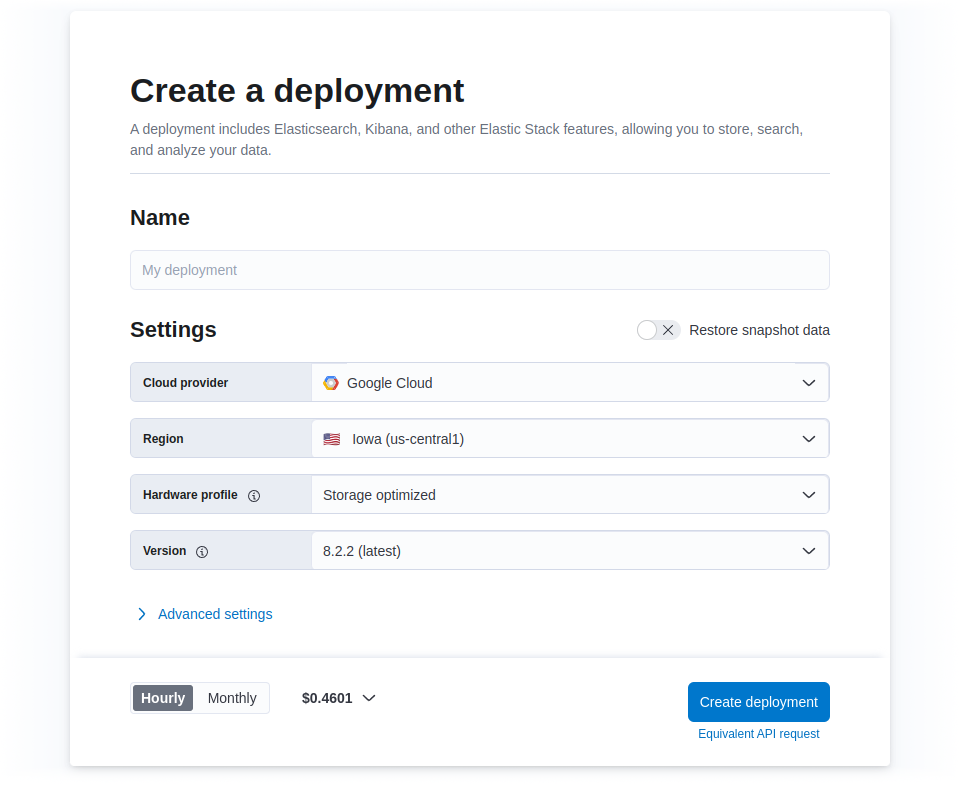
Create a Deployment Part 2
From the Elastic Cloud dashboard, click on Create deployment at the top right of the Elasticsearch Service box.

The Create a deployment box should appear with the default settings and pricing.
Customise the Deployment Part 3
The default deployment settings can be scaled back to provide an efficient initial deployment which can easily be scaled back up, if/when required.
Adjust the suggested configuration below to your situation.
| Property | Recommended setting |
|---|---|
| Name | The name of the context-aware physical space this deployment represents |
| Cloud provider & Region | Select based on geographic proximity and/or loyalty |
| Hardware profile | General purpose |
| Version | 8.x.x (latest) |
| Autoscale | Enable for production deployments |
| Elasticsearch | Choose the minimum size per zone, 1 zone |
| Machine Learning instances | Enable, then choose the minimum size per zone, 1 zone* |
| Kibana | Choose the minimum size per zone, 1 zone* |
| Integrations Server | Choose the minimum size per zone, 1 zone* |
| Enterprise Search | Choose the minimum size per zone, 1 zone* |
* these instances should be included FREE in the Summary pane
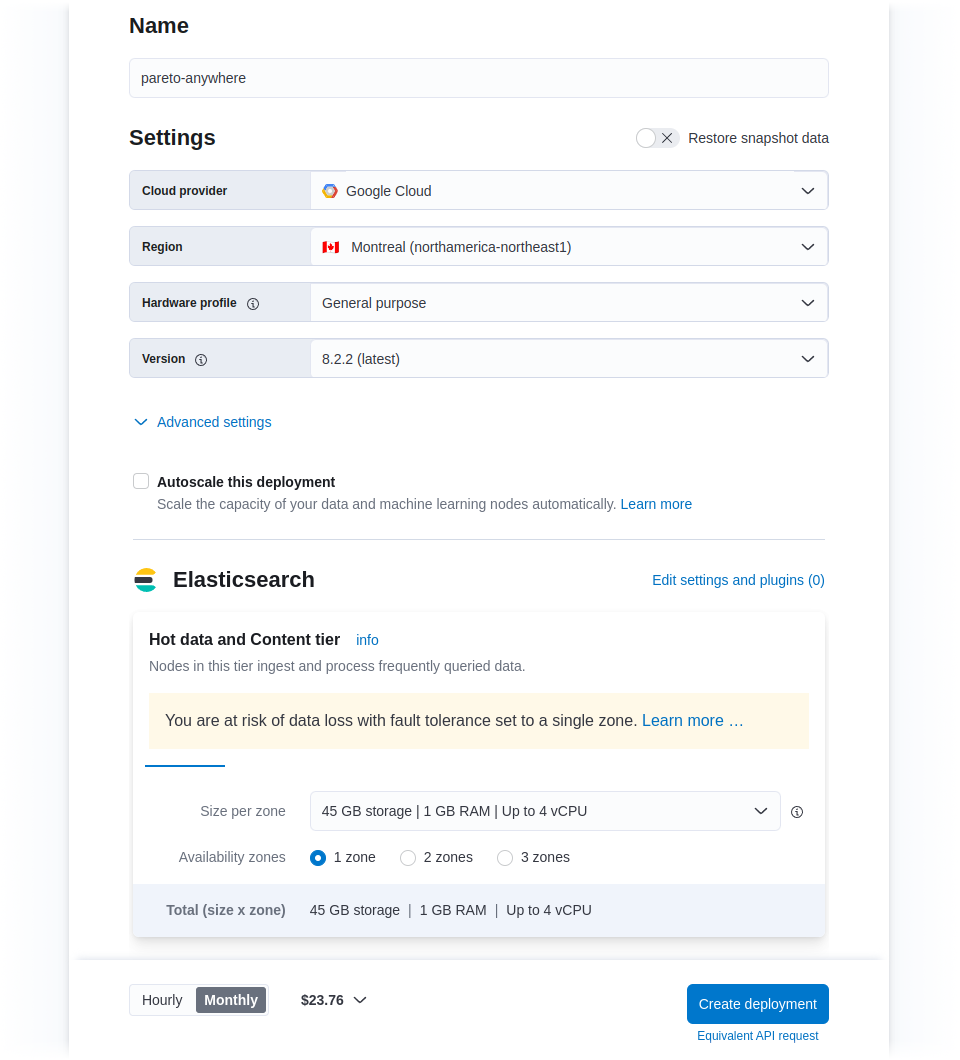
Note the hourly/monthly rate of the deployment based on the configuration. Click the Create deployment button at the bottom of the box to initiate the deployment, which should complete within a few minutes.
Copy the Root Credentials Part 4
While the deployment is being created…
… copy the password associated with the elastic user, and store it in a safe place.
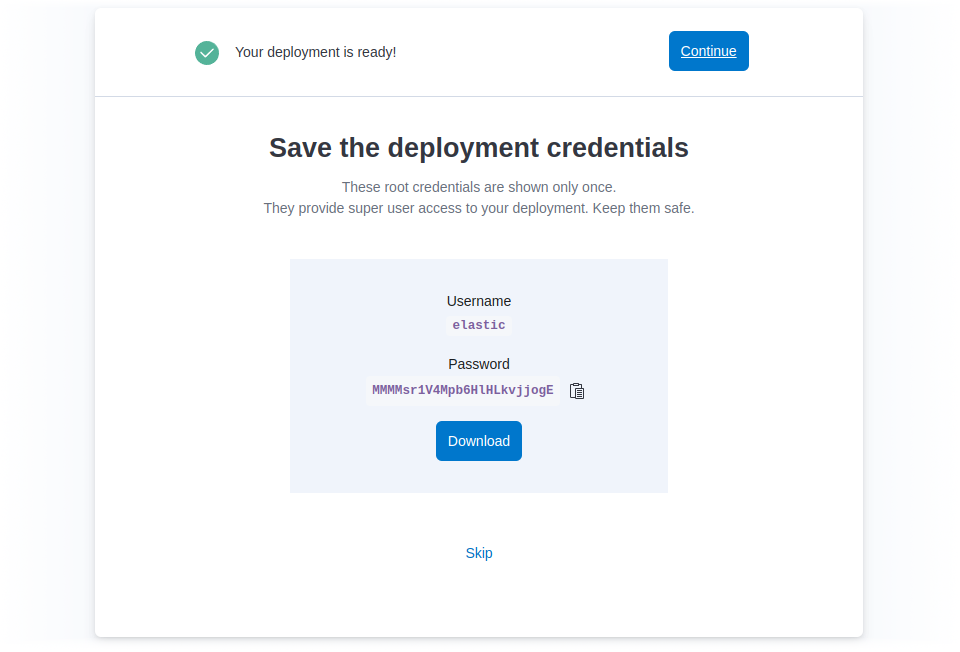
Click on the Continue button when the instance becomes available. Your deployment is ready!
Create a Role and User Step 2 of 3
Create a role/user combination for Pareto Anywhere to push data to the deployment.
- What are roles?
- A role specifies what a given user can access and manipulate in Elasticsearch and Kibana.
- What access is required?
- Pareto Anywhere will need to write data to specific indices, which it will do by connecting to Elasticsearch with the user credentials created in this step.

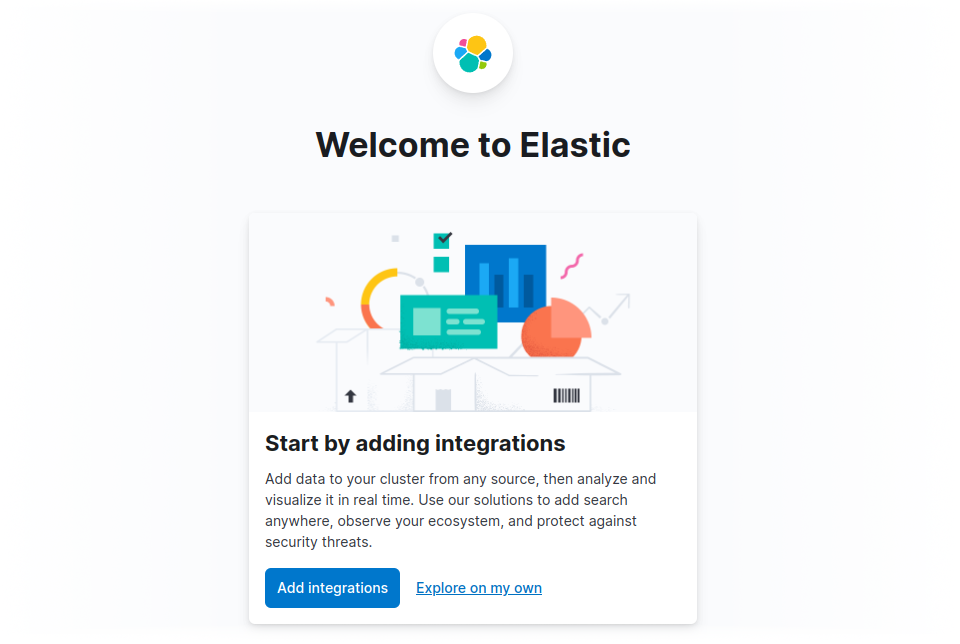
Initial Login Part 1
A welcome screen will offer the option to Add integrations or to Explore on your own. Click the Explore on my own option to proceed to the Home screen of the deployment.
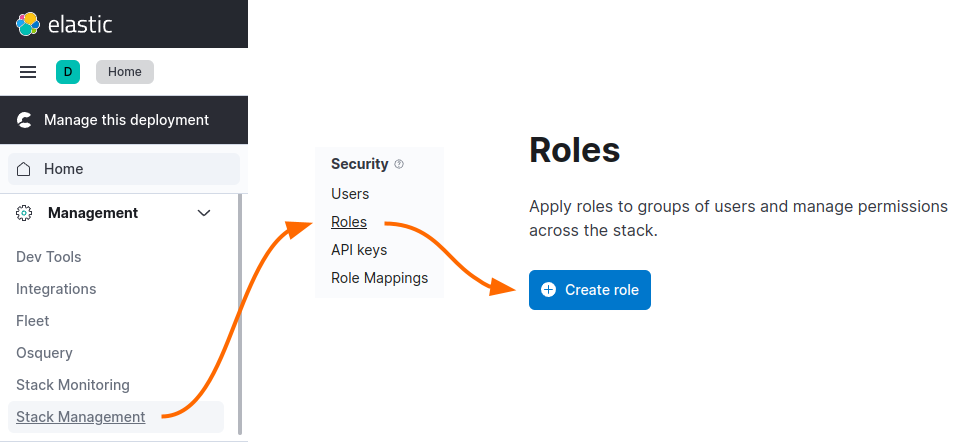
Create Role Part 2
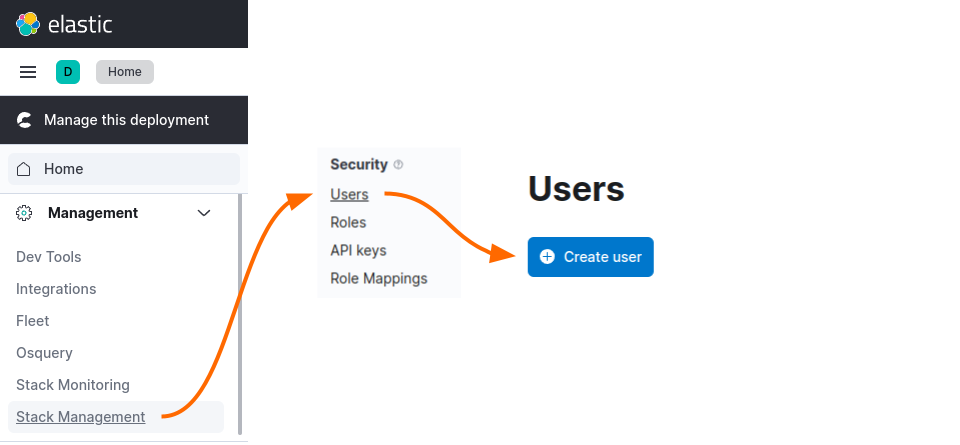
Navigate to the Roles page using the left menu bar, selecting Management | Stack Management → Security | Roles. From the Roles page, click on the Create role button.
On the Create role page, enter pareto as the Role name, and then complete the fields in the Elasticsearch box as follows:
- Cluster privileges
- monitor
- Indices
- raddec, dynamb
- Privileges
- create_index, create_doc, read
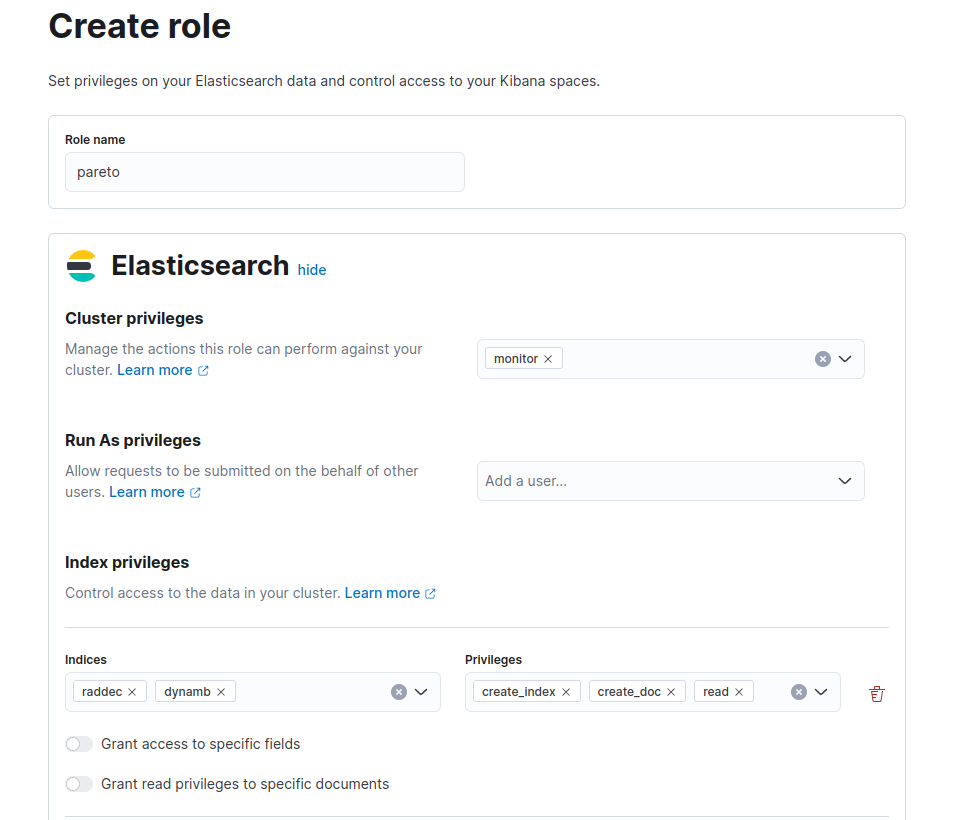
Click on the Create role button at the bottom of the page to create the pareto role.
Create User Part 3
Navigate to the Users page using the left menu bar, selecting Management | Stack Management → Security | Users. From the Users page, click on the Create user button.
On the Create user page, complete the fields as follows:
- Username
- pareto-anywhere
- Full name
- Pareto Anywhere
- Password
- Choose a strong password which will be required in Part 4
- Roles
- pareto
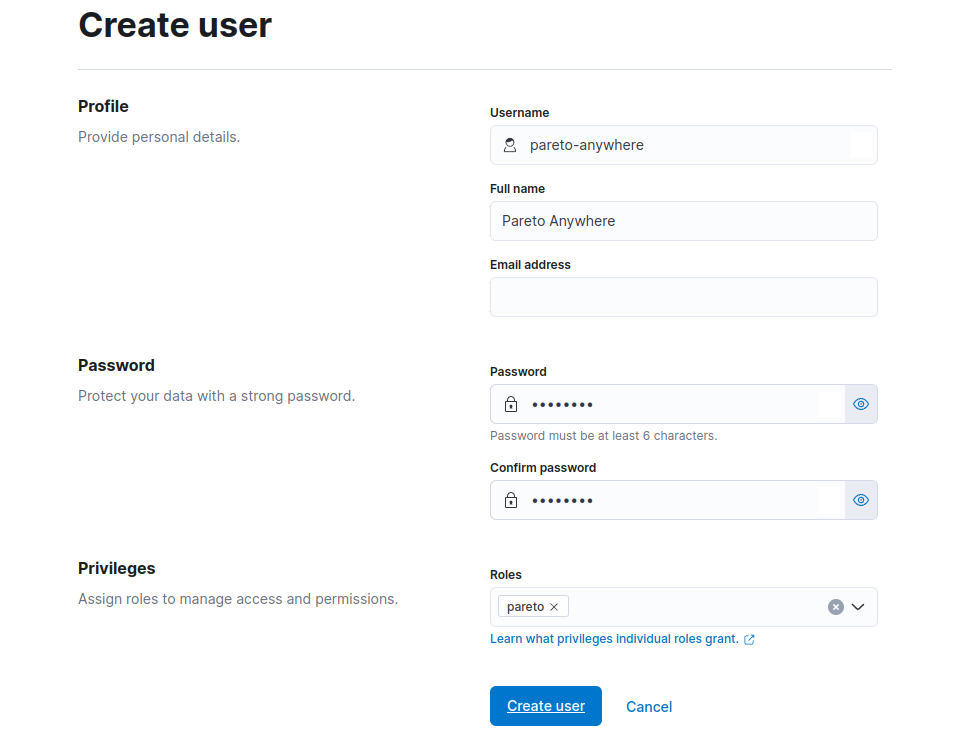
Click on the Create user button at the bottom of the page to create the pareto-anywhere user.
Compile the Node URL Part 4
The deployment is now ready to receive data from a Pareto Anywhere instance, which will connect to Elasticsearch using the deployment's Node URL. The Node URL has the following form:
https://pareto-anywhere:password@host
As the username (pareto-anywhere) and password (from Part 3) are already known, the only remaining step is to retrieve the endpoint URL of the Elasticsearch instance, which includes the host.
Retrieve the endpoint URL of the Elasticsearch instance from the Elastic Cloud dashboard as follows:
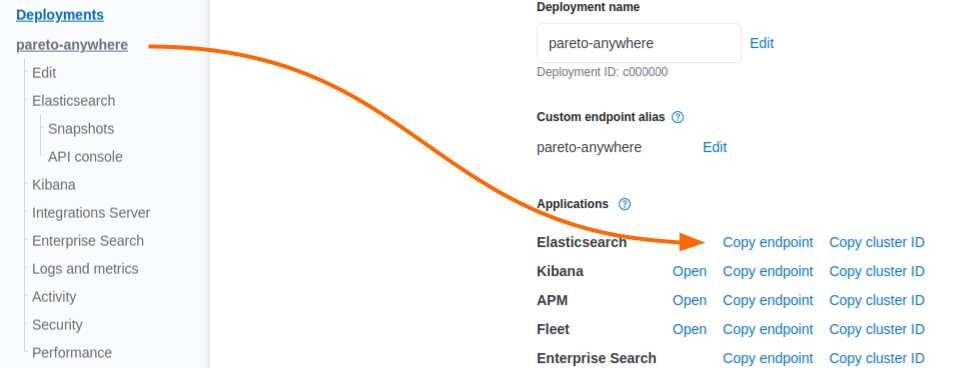
The Elasticsearch endpoint will likely have the form https://deployment-name.es.region.provider.elastic-cloud.com with the host being everything following the https://
Combine the username, password and host to determine the Node URL of the deployment, which should have the following form:
https://pareto-anywhere:password@deployment-name.es.region.provider.elastic-cloud.com
Use this Node URL to configure the Pareto Anywhere instance to forward raddec and dynamb data to the Elasticsearch instance, as indicated in the tutorials below, and then proceed to Step 3.
-

-
Run Pareto Anywhere on a Raspberry Pi
Install and run Pareto Anywhere on a Pi to make any physical space context-aware.
-

-
Run Pareto Anywhere on a PC
Install and run Pareto Anywhere on a personal computer to make any physical space context-aware.
Create Data Views Step 3 of 3
Create a data view for both raddec and dynamb data.
- What's a data view?
- A data view provides Kibana access to specific Elasticsearch data to explore.
- What's a raddec?
- A raddec is a data structure that represents a radio decoding.
- What's a dynamb?
- A dynamb is a data structure that represents dynamic ambient data.

Confirm Data Part 1
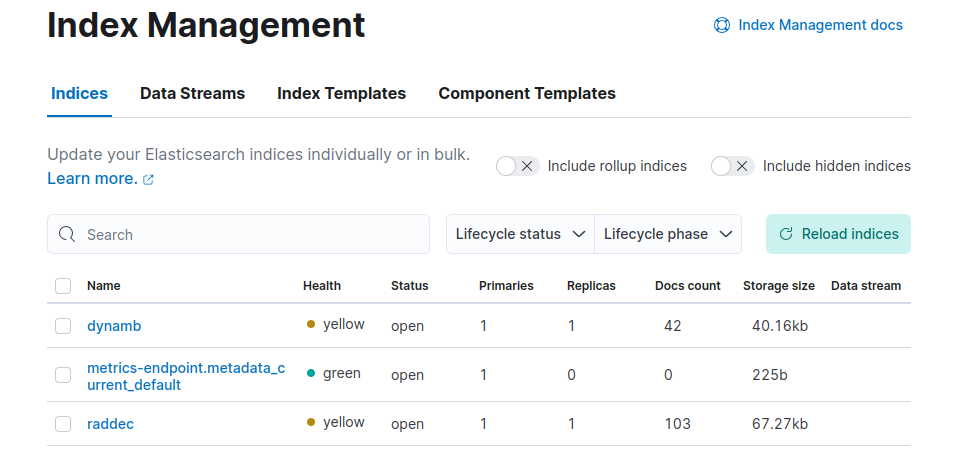
Navigate to the Index Management page using the left menu bar, selecting Management | Stack Management → Data | Index Management.
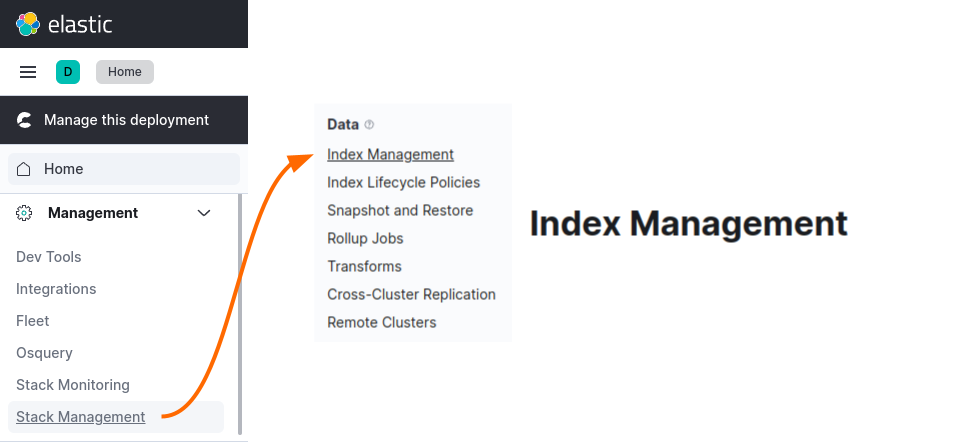
Confirm that the raddec and dynamb indices are present. This validates that Pareto Anywhere is forwarding data to the Elasticsearch instance.
Create raddec Data View Part 2
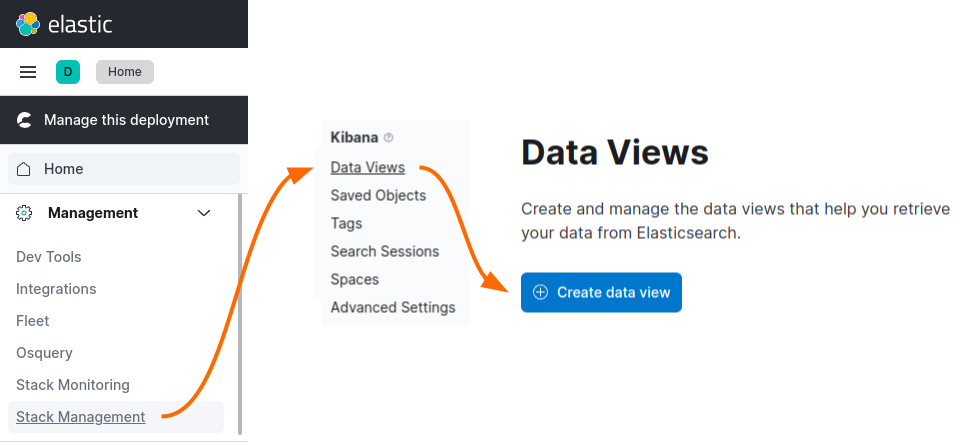
Navigate to the Data Views page using the left menu bar, selecting Management | Stack Management → Kibana | Data Views. From the Data Views page, click on the Create data view button.
Create a data view of the raddec index by typing raddec in the Name field, and observe the notice that the index pattern matches 1 source. Select @timestamp in the Timestamp field.
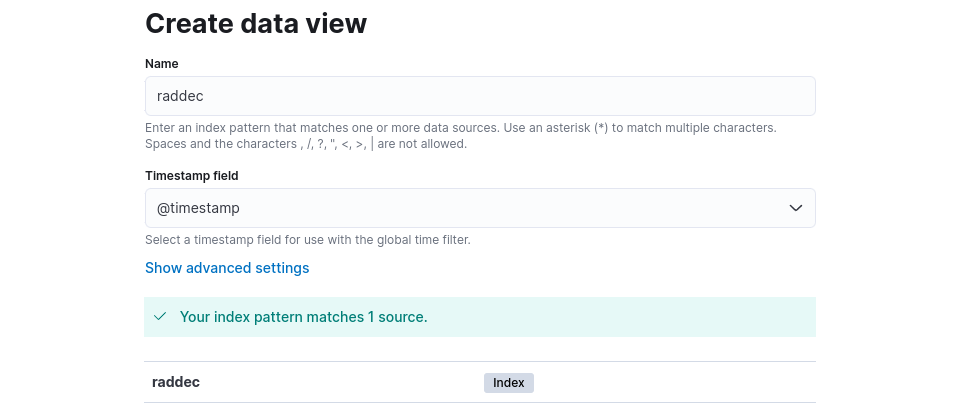
Click on the Create data view button at the bottom of the page to create the raddec data view. The raddec index is now accessible in Kibana.
Create dynamb Data View Part 3
Navigate to the Data Views page using the left menu bar, selecting Management | Stack Management → Kibana | Data Views. From the Data Views page, click on the Create data view button.
Create a data view of the dynamb index by typing dynamb in the Name field, and observe the notice that the index pattern matches 1 source. Select @timestamp in the Timestamp field.
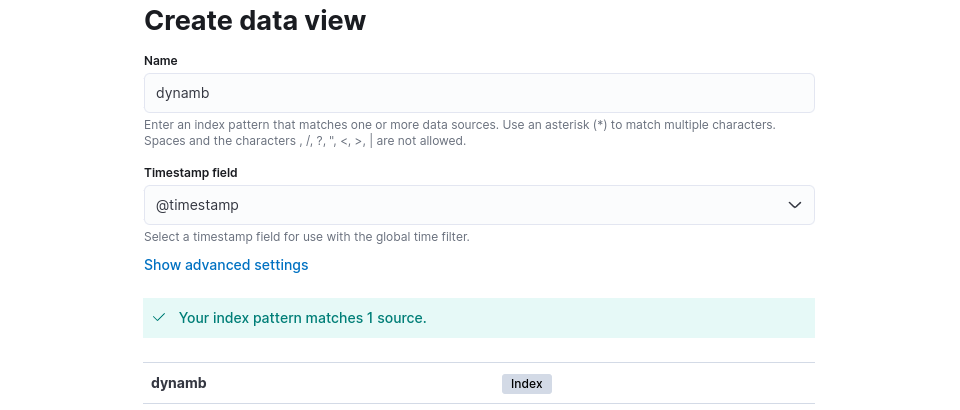
Click on the Create data view button at the bottom of the page to create the dynamb data view. The dynamb index is now accessible in Kibana.
Discover the data Part 4
Navigate to the Discover page using the left menu bar, selecting Analytics | Discover.
From the Discover page, select the raddec index from the data view pull-down and observe the raddec Documents which correspond to the selected time range. Select the dynamb index from the data view pull-down and observe the dynamb Documents which correspond to the selected time range.

The Elastic Cloud deployment is ready for the exploration and analysis of data from context-aware physical spaces!


Tutorial prepared with ♥ by jeffyactive.
You can reelyActive's open source efforts directly by contributing code & docs, collectively by sharing across your network, and commercially through our packages.Where to next?
Continue exploring our open architecture and all its applications.
-

-
reelyActive & Elastic
Elastic-Search-Award-winning integration
-

-
reelyActive Developers
Browse all developer documentation and tutorials.